![]()
![]()
![]()
![]()
|
|
|
|
|
How to manage a Z-Wave network through the abstraction layer provided by the HDM Module using the Web Admin Console.
Prerequisites
Follow the instructions in the Setup Guide to Set up the environment for the Z-Wave Module by executing the zwave-hdm.txt install script or by manually installing (and starting) the necessary bundles.
You need also to install the Device Access with Web Console support by executing the hdm.web.txt install script or by manually installing (and starting) the necessary bundles. See HDM Setup guide for details.
Managing Devices through HDM
Accessing Z-Wave Devices
After setting up the environment, open the Web Admin Console page in a browser and log in. Serch for the IoT -> HDM tab and click on it. This opens the Home Devices page with the Devices tab selected by default. You can filter out only the available devices that communicate over the Z-Wave protocol by selecting Z-Wave from the Protocol Adapter box.

The Devices tab of the Home Devices page shows the devices registered in the Home Device Manager. Here, the capabilities of the relevant protocol adapter are limited. It does not support "add", "search" and "remove" operations. The initialization of information from a device is automatically performed through the explicitly set actions of the Z-Wave Network Controller.
Examining and Changing Device Details
To view detailed information about a device, click the Details icon (i).
The Device Details dialog will appear.
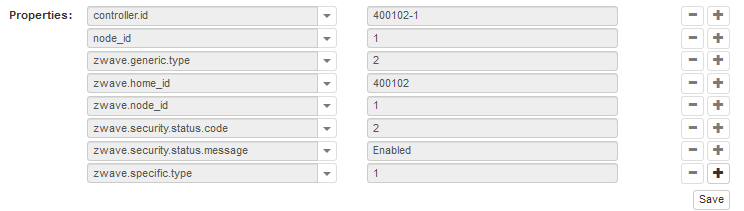
You can change the device attributes, as well as define additional properties in the Properties list, if required.
Property Name |
Access |
Meta Info Property Resolution Policy |
Root Z-Wave Home Device Spi |
Root Secure Z-Wave Home Device Spi UID :secure |
Z-Wave Child Device Spi UID #<String>(digit) UID # (digit) |
|---|---|---|---|---|---|
Mandatory Properties |
|||||
zwave.home_id |
R |
Mandatory |
|
|
|
node_id |
R |
Mandatory |
|
|
|
zwave.node_id |
R |
Mandatory |
|
|
|
zwave.generic.type |
R |
Optional |
|
|
|
zwave.specific.type |
R |
Optional |
|
|
|
zwave.manufacturer_specific.manufacturer_id |
R |
Optional |
|
|
|
zwave.manufacturer_specific.product_id |
R |
Optional |
|
|
|
zwave.manufacturer_specific.product_type_id |
R |
Optional |
|
|
|
zwave.protocol.version |
R |
Optional |
|
|
|
zwave.application.version |
R |
Optional |
|
|
|
zwave.library.type |
R |
Optional |
|
|
|
zwave.sleeping.node |
R |
Optional |
|
|
|
zwave.secure |
R |
Optional |
|
|
|
zwave.minimal.polling.interval |
RW |
Mandatory |
|
|
|
zwave.disable.full.polling |
RW |
Mandatory |
|
|
|
zwave.device.configured |
RE |
Mandatory |
|
|
|
zwave.device.configured.code STATE_NOT_CONFIGURED_NOT_TRIED 0; STATE_NOT_CONFIGURED_NO_AVAILABLE_CONFIGURATION 1; STATE_NOT_CONFIGURED_INCORRECT_AVAILABLE_CONFIGURATION 2; STATE_NOT_CONFIGURED_CONFIG_FAILED 3; STATE_CONFIGURATION_RESET 4; STATE_CONFIGURED 255; |
RE |
Mandatory |
|
|
|
zwave.plus |
R |
Optional |
|
|
|
Conditional Properties Added only if the Manufacturer Specific CC (0x72) version 2 is supported by the device. |
|||||
zwave.manufacturer_specific.serial |
R |
Optional |
|
|
|
zwave.manufacturer_specific.oem_id |
R |
Optional |
|
|
|
Added only if the Z-Wave Plus Info CC (0x5E) is supported by the device (i.e. zwave.plus property's value is set to true). |
|||||
zwave.plus.version |
R |
Optional |
|
|
|
zwave.plus.role.type |
R |
Optional |
|
|
|
zwave.plus.node.type |
R |
Optional |
|
|
|
zwave.plus.device.type |
R |
Optional |
|
|
|
zwave.plus.installer.icon.type |
R |
Optional |
|
|
|
zwave.plus.installer.icon.type |
R |
Optional |
|
|
|
Added only if the Security CC (0x98) is supported by the device. |
|||||
zwave.security.status.code SECURE_INCLUSION_NOT_SUPPORTED 4; SECURE_INCLUSION_IN_PROGRESS 3; SECURE_INCLUSION_ENABLED 2; SECURE_INCLUSION_SUPPORTED 1; SECURE_INCLUSION_SUCCESSFUL 0; SECURE_INCLUSION_DISABLED -1; SECURE_INCLUSION_FAIL_GENERAL -2; SECURE_INCLUSION_FAIL_INVALID_NETWORK_KEY -3; SECURE_INCLUSION_FAIL_INVALID_MESSAGE_OR_MAC -4; SECURE_INCLUSION_FAIL_INVALID_SCHEME -5; |
RE |
Mandatory |
|
|
|
zwave.security.status.message |
RE |
Mandatory |
|
|
|
Added only if the device contains an instance of the TemperatureActuator, MultiLevelSensor, AlarmSensor or ZWaveAlarmV2 Device Class. |
|||||
zwave.cc.spec.type |
R |
Optional |
|
|
|
Added only if the device contains an instance of the TemperatureActuator, MultiLevelSensor, AlarmSensor or ZWaveAlarmV2 Device Class or supports MultiChannelCommand Class. |
|||||
instance_id |
R |
Optional |
|
|
|
zwave.instance_id |
R |
Optional |
|
|
|
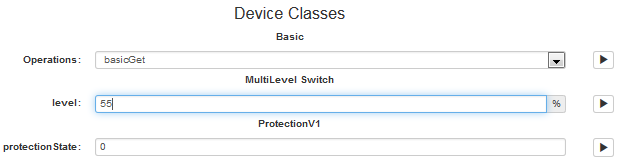
Besides the details of the device itself, under Device Classes, it shows the device class objects that the device has. There you can launch an operation on or modify a property of a device class object.
 --+
--+
Z-Wave Network Controller
In order to add a Z-Wave device to an existing network, the Z-Wave controller must be set in adding/removing mode, or reset in cases when you need to have its defaults.
Adding Mode
To set the Z-Wave controller device in adding mode so that a device/node can be added to the network, follow these steps:
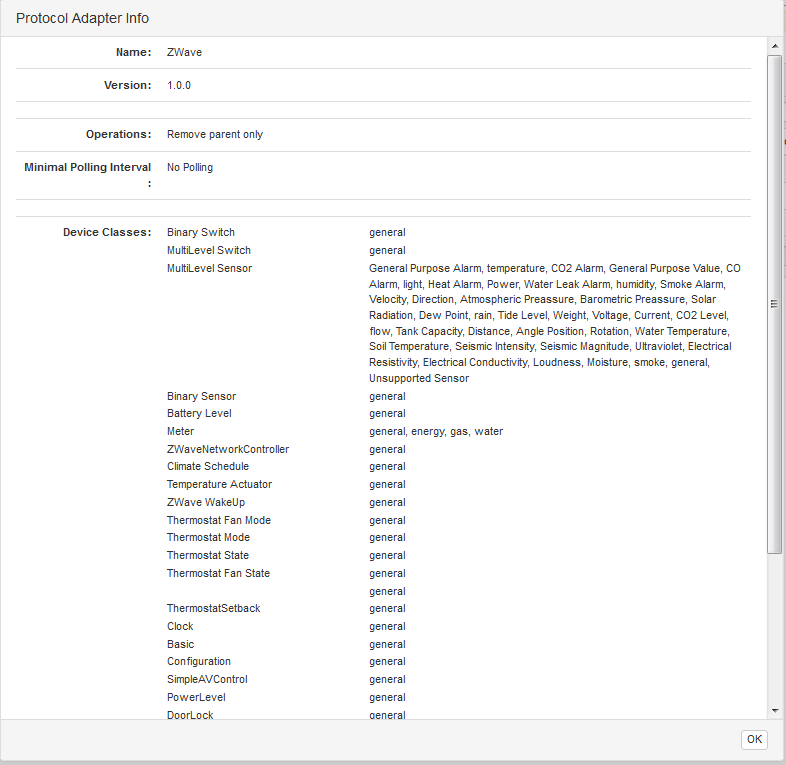
To get more details on the protocol adapter select the Info button, which opens the Protocol Adapter Info window:
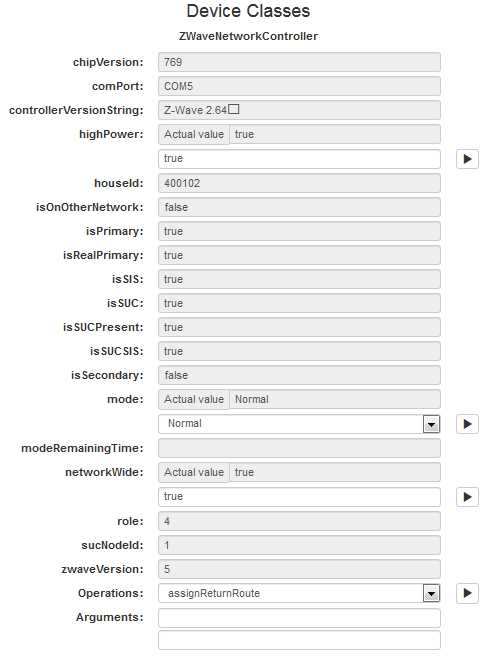
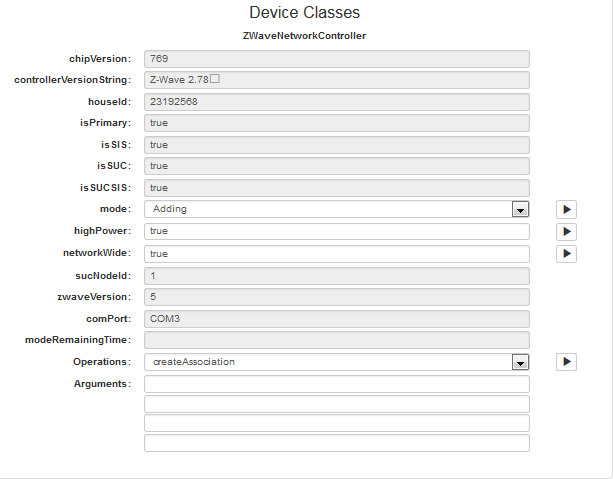
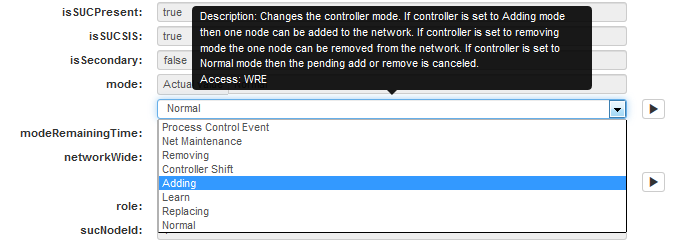
In the Device Information window that appears, locate the Device Classes section which lists the contained ZWaveNetworkController device class object and its properties. The device class object's mode options are available in the mode box.
The available modes are as follows:
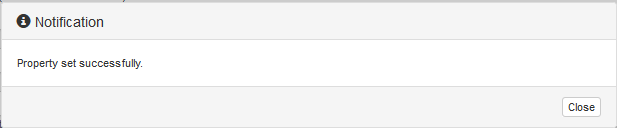
If the operation returns some result it will appear in a pop-up:
Including a Slave/End Device to the Network
Now that the controller is in the correct "Adding" mode, it's time for you to join your Z-Wave device to your controller.
While in Adding mode you should be able to connect your slave Z-Wave device by associating it to the controller - this is normally achieved by pressing the button on your end device. Your end-device might have a different adding method, so please consult the user documentation of the device for further information. After the adding operation the controller will switch to Normal mode automatically.
Notice that if the slave device has already been joined to some other network, it first needs to be removed from it or reset - for that purpose we direct the user to execute the "Removing Mode" steps first and then get back to "Adding Mode"
Removing Mode
To set the Z-Wave controller device in a state for removing a node from the Z-Wave network, follow steps 1 through 6 from the Adding Mode section. Here the only difference is in step 4 - select the Removing property from the mode drop box.

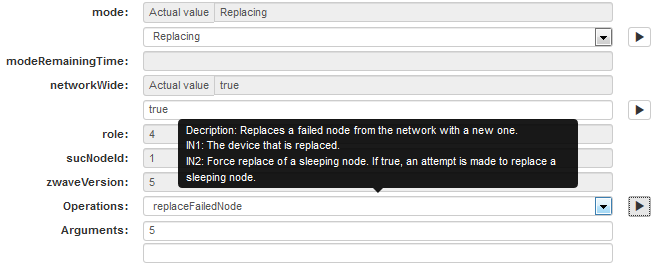
Replacing Mode
This section describes the Z-Wave Network Controller Replacing mode. It is not allowed to set this mode explicitly via the drop down menu. The controller enters Replacing mode if the replaceFailedNode command is executed successfully.
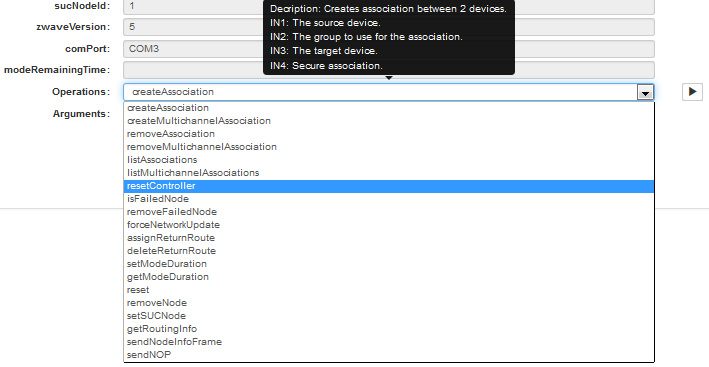
Resetting Mode
This section describes the steps to reset the Z-Wave Network Controller. Once this operation is performed, the controller is set to its factory defaults. As a result, all network information such as node IDs and routing tables will be lost without the option to be recovered.
Operating a Multilevel Switch
To execute an operation on a device class object of a device, e.g. to change the level of a Multilevel Switch:
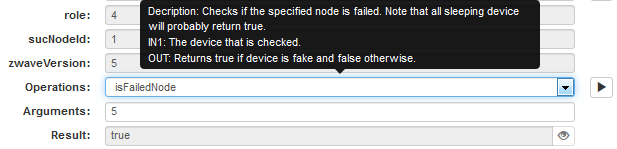
The device class object's operations are available in the Operations box underneath the device class label.