![]()
![]()
![]()
![]()
|
|
|
|
|
Rules List
There are three tabs of the Automation Web Console interface and the first of them is Rules. It opens a sortable table with the rule's UID and Name, its Status, Tags, Description, and the allowed Actions to perform on the rule. A rule appears in this list if it is successfully created after:
• its bundle or file is installed/loaded
• a REST or JSON-RPC request
• a Web Console action:
• using the Add button ![]() under the Actions column
under the Actions column
• using the Copy button ![]() to create a similar rule, which can be easily updated
to create a similar rule, which can be easily updated
• using the Create rule button ![]() from the Template tab
from the Template tab
Some rules, provided to the system not via the Web Console, but by a file or a bundle, are updated or removed when the providing file/bundle is updated or uninstalled.
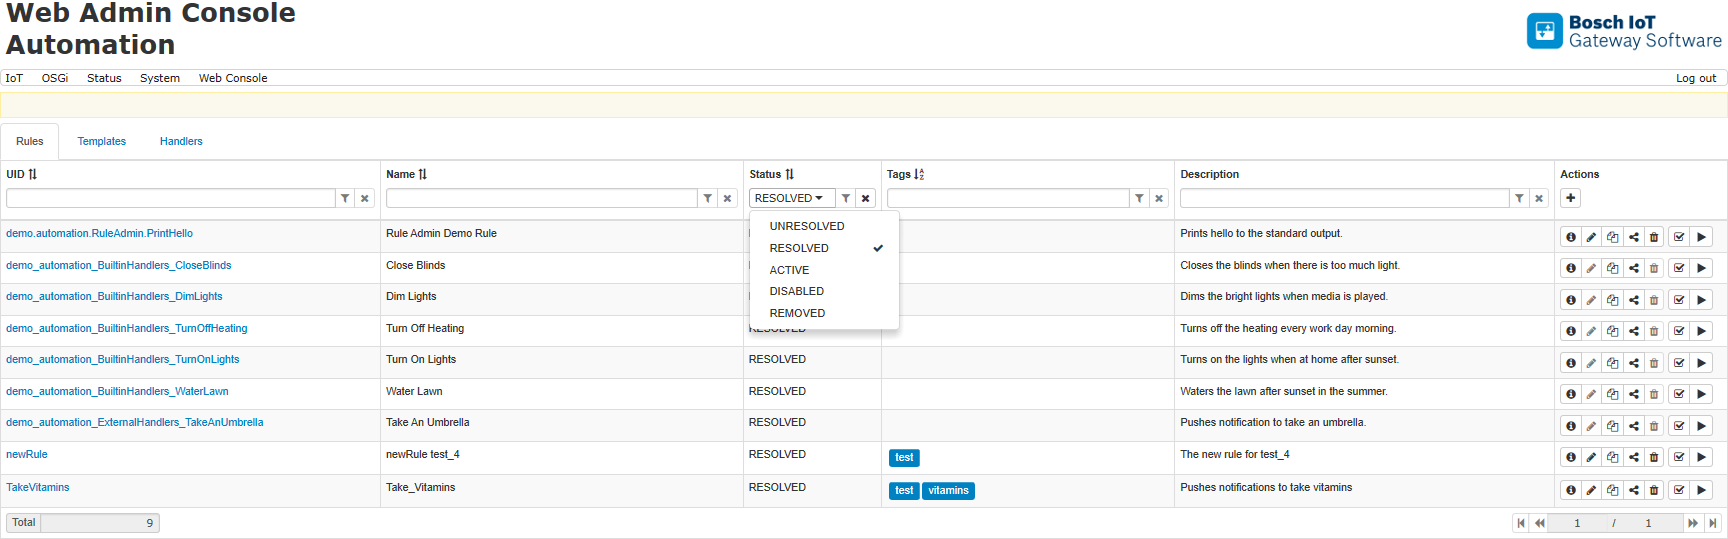
Sort and Filter
To sort by column, click on the column title, if an icon with arrows is placed next to it. To filter rules, write the filtering text in the corresponding field or choose from the drop-down menu for Status, then click on the filter button ![]() or press Enter. To clear an applied filter, press the clear button
or press Enter. To clear an applied filter, press the clear button ![]() . The Status descriptions are changed according to the actions applied.
. The Status descriptions are changed according to the actions applied.
The Web Console provides several buttons in the Actions column to manage the rules – Add, Details, Update, Copy, Create template, Remove, Disable/Enable and Run now. Their action is described in the following sections.
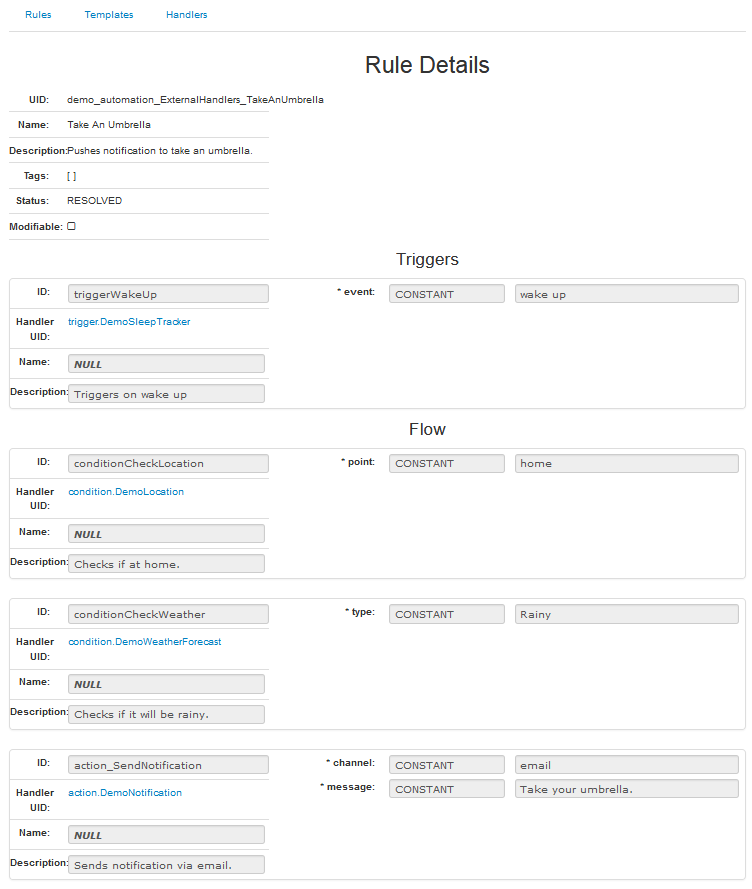
Rule Details
To view the available information of a particular rule click on its UID or on the Details button ![]() from the end of the rule's raw. The table that opens is not editable. It contains General information and details about the Triggers and the Flow. If a Handler is used, a click on its UID provides more details, including its Inputs/Outputs.
from the end of the rule's raw. The table that opens is not editable. It contains General information and details about the Triggers and the Flow. If a Handler is used, a click on its UID provides more details, including its Inputs/Outputs.
Creating a Rule
To create a rule via the Web Console:
• use the action buttons of Add ![]() or Copy
or Copy ![]() under the Actions column of the Rules tab
under the Actions column of the Rules tab
• use the Create rule button ![]() from the Templates tab. To learn more about this option refer to "Creating a Rule from a Template" from the Templates guide.
from the Templates tab. To learn more about this option refer to "Creating a Rule from a Template" from the Templates guide.
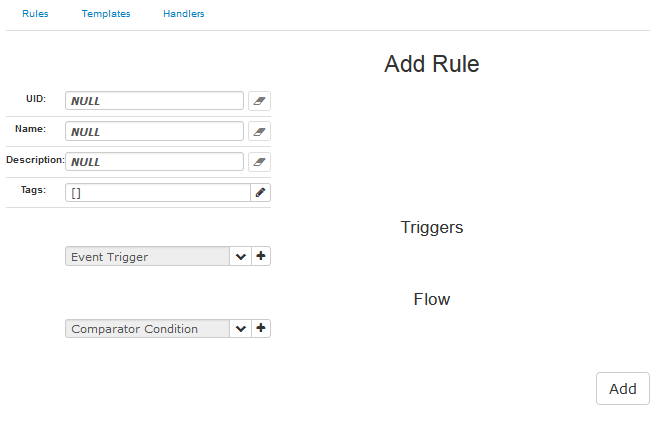
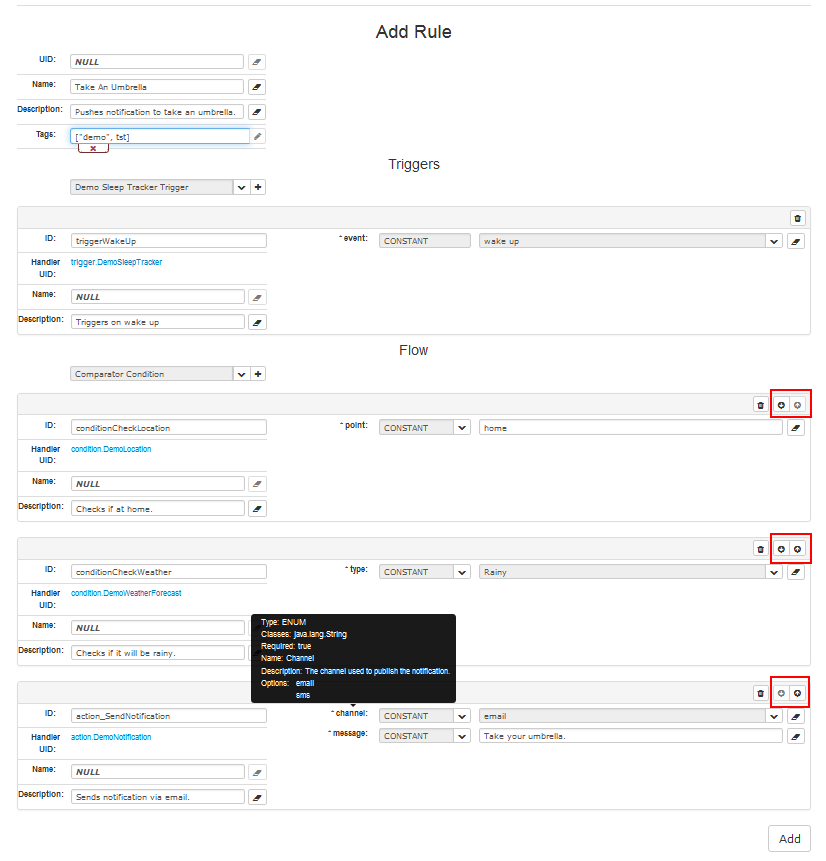
Adding a Rule
Clicking on the ![]() button right under the Actions column opens up a page to fill in the empty fields for the general information of UID, Name, Description, Tags and with add buttons for adding Triggers and Flow.
button right under the Actions column opens up a page to fill in the empty fields for the general information of UID, Name, Description, Tags and with add buttons for adding Triggers and Flow.
In case of a wrong data format, an error message appears and the process of adding is not allowed:

How to add Triggers and Flow is described in the following sections below:
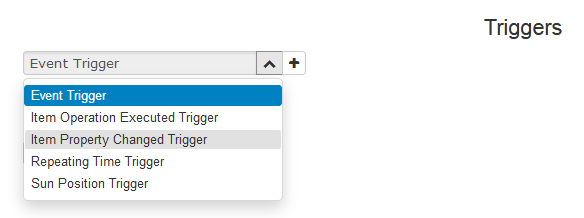
Adding Triggers
Before adding a trigger choose its type from the drop-down menu:
After a click on the Add button ![]() , a table appears. It corresponds to the type of the selected trigger – with empty input spaces or with available or proposed value and drop-down menus for choosing from existing options:
, a table appears. It corresponds to the type of the selected trigger – with empty input spaces or with available or proposed value and drop-down menus for choosing from existing options:
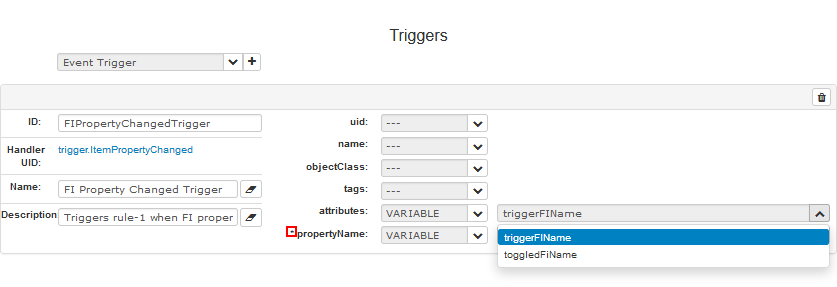
The fields marked with asterisk - *, are mandatory for successful rule execution..
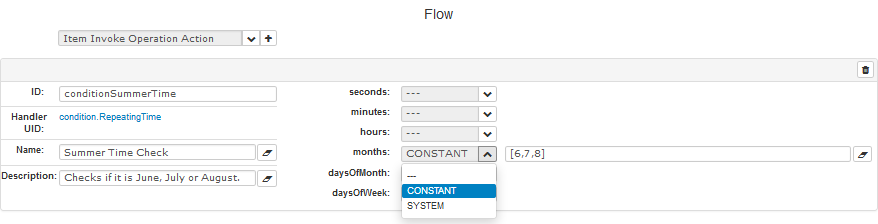
Adding a Flow
To add a flow first choose one of the available Action or Condition handlers from the drop-down menu:
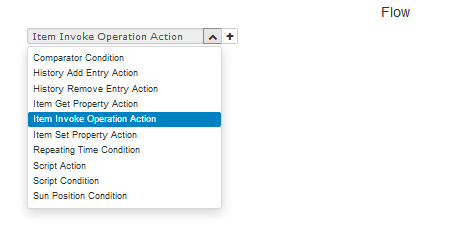
and then click on the Add button ![]() , which opens a suitable for editing table. To provide the data, corresponding the selected handler in the right format, use the help of tooltip, where available. The fields marked with asterisk - *, must not be left empty.
, which opens a suitable for editing table. To provide the data, corresponding the selected handler in the right format, use the help of tooltip, where available. The fields marked with asterisk - *, must not be left empty.
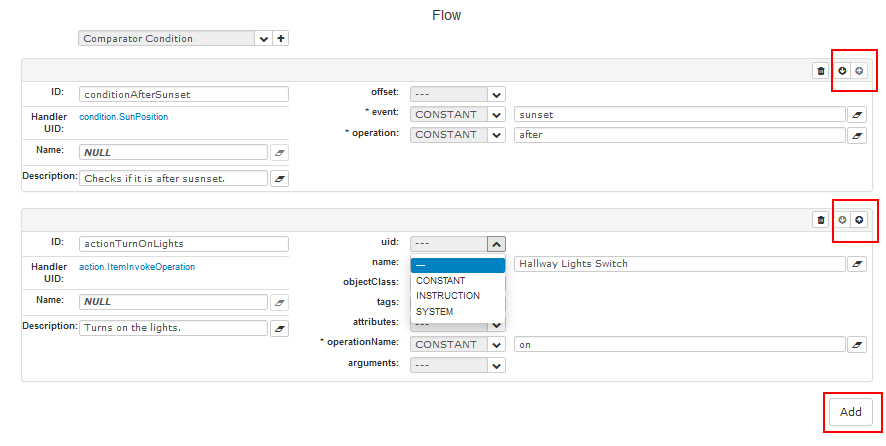
If more than one Action or Condition handlers are used, move up and down buttons appear for ordering the Flow table in a preferred way. After all data is filled in, a click on the Add button below saves the rule.
The fields marked with asterisk - *, are mandatory for successful rule execution.
Copying a Rule
The Web Console facilitates the process of creating new rules via the copying action:

It provides the whole information of the original rule as in Add Rule window with an empty UID space for the new rule and with the same ability for adding a Trigger and a Flow as described above.
In case the UID field is left empty, the web console provides a system UID.
If the user added UID is already in the system, an error message appears prompting for unique UID.
Updating a Rule
Every listed rule, created from the Web Console can be updated by using the button ![]() on the right side of the Rules tab. Updating a rule is similar to the adding a rule action, except that the UID cannot be changed:
on the right side of the Rules tab. Updating a rule is similar to the adding a rule action, except that the UID cannot be changed:

Clicking on the Update button saves the operation if the data is provided in the right format, otherwise an error message appears, as mentioned above.
Using a Rule to Create a Template
You can use an existing rule to create a new template and then use it to easily create many similar rules.
In the example below a demo rule is used, which is available after installing the Automation Builtin Handlers Demo – com.prosyst.mbs.automation.builtin.handlers-demo. It appears as the Turn Off Heating rule in the web console:

Pressing the Create template button ![]() opens the Create template page where you can:
opens the Create template page where you can:
As a result you will have a new template, which will be listed in the Templates tab. For the JSON representation of the template above, refer to "Turn Off Heating Template Example" section from the Template JSON Examples.
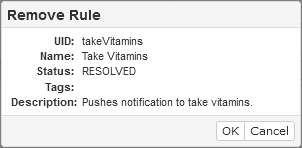
Removing a Rule
To remove a rule use the ![]() button. A new window appears prompting for confirmation:
button. A new window appears prompting for confirmation:
Rule Actions
The possible actions are situated in the column on the far right.
Enable/Disable Rule
To enable/disable a rule, check/uncheck the checkbox ![]() in the Actions column. The checkbox shows whether a rule is enabled or disabled and the Status is changed accordingly to RESOLVED or DISABLED.
in the Actions column. The checkbox shows whether a rule is enabled or disabled and the Status is changed accordingly to RESOLVED or DISABLED.
Run Now a Rule
To execute the flow of actions in the rule immediately use the Run now button ![]() .
.